The issue with the Cost of Goods Sold (COGS) going out of sync in SQL-Ledger is a known problem, especially when editing past invoices. Since SQL-Ledger uses the FIFO (First-In, First-Out) method for inventory costing, modifying historical transactions can disrupt the accuracy of your COGS calculations.
Possible Solutions:
Purchase the COGS Reposting Script:
The developers of SQL-Ledger offer a script that recalculates and fixes COGS across all invoices.
You can purchase the script directly from their website:
I have many assemblies and sub-assemblies. I created a new assembly, added items, and saved it. Now I wish to add more items. After adding, updating, and saving, the assembly shows the correct dollar value, but when I open the assembly, the added parts are not listed. Why is this happening, and how do I resolve the problem?
Response by dws (November 17, 2009):
You cannot change an assembly which has been sold or stocked by simply editing it. You have to use the Changeup function to make the changes.
Summary and Solution
Understanding the Issue
Problem: After adding new items to an existing assembly and saving it, the assembly’s dollar value updates correctly, but the newly added parts do not appear when reopening the assembly.
Cause: This issue occurs because the assembly has already been sold or stocked, and direct edits to such assemblies are not permitted in SQL-Ledger’s standard editing mode.
Solution: Use the Changeup Function
Changeup Function: SQL-Ledger provides a Changeup function specifically designed to modify assemblies that have already been sold or stocked.
Steps to Resolve:
Access the Changeup Function:
Navigate to the assembly you wish to modify.
Look for the Changeup option, which may be located in the assembly’s menu or toolbar.
Modify the Assembly:
Use the Changeup interface to add or remove items from the assembly.
Update quantities, descriptions, or other relevant details as needed.
Save Changes:
After making the necessary adjustments, save the changes through the Changeup function.
This ensures that all changes are properly recorded and reflected in the system.
Why Direct Editing Doesn’t Work
Integrity of Historical Data: SQL-Ledger prevents direct edits to sold or stocked assemblies to maintain the integrity of historical transaction data.
Proper Tracking: Using the Changeup function allows the system to track changes over time, ensuring accurate inventory management and accounting.
OK I’ve been trying to figure out how to create a recurring transaction from a new invoice, not an already created invoice.
I click on Sales Invoice, enter product and amount and date on the invoice. I also enter a new description and change the invoice date to 11-01-2009. Next, I clicked on Schedule and entered another description here, set start date to 11-01-2009, checked off Email Invoice, and then clicked Save. The recurring transaction brings me back to the invoice and does not save anything in the recurring transaction list.
What am I missing?
Thanks,
Dan
Response from Marcus (localguru), Germany, on Saturday, October 24, 2009
Hi Dan,
If I understand the recurring concept of SQL-Ledger correctly, the first invoice is never a recurring invoice or transaction. In your example, you need to save the invoice itself first to create a recurring transaction.
However, if you set the date of the invoice and the first recurring transaction to the same date (e.g., 11-01-2009), you will create an invoice with a future date (11-01-2009) and not a recurring transaction starting on that date.
Important Notes
Initial Invoice Date: The date of the initial invoice should reflect when the first transaction occurred, not necessarily the start date of the recurring series.
Future Dated Invoices: Creating an invoice with a future date may not generate the recurring transaction as expected and can cause accounting inconsistencies.
Recurring Transaction Creation: Recurring transactions are typically based on existing, saved transactions. Saving the initial invoice provides a template for the recurring entries.
Summary
To successfully create a recurring transaction in SQL-Ledger:
First, create and save the initial invoice with the correct date and details.
Then, set up the recurring schedule from the saved invoice, specifying the start date and frequency.
Finally, verify that the recurring transaction has been saved and is listed correctly.
By following these steps, you should be able to generate recurring invoices that will automatically be created and, if configured, emailed to your customers at the specified intervals.
Could someone point me in the right direction to create an invoice template for a pre-printed form. In other words, how do you place the invoice data so it drops into the correct box on the form.
Thanks
Lawrence
Customizing an invoice template to fit a pre-printed form in SQL-Ledger involves adjusting the positions of the invoice data so they align with the designated areas on your form. Below is a comprehensive guide to help you set up your invoice template accordingly.
1. Understanding SQL-Ledger’s Template System
Template Language: SQL-Ledger uses LaTeX for its invoice templates.
Template Files: Invoice templates are located in the templates directory of your SQL-Ledger installation, typically named invoice.tex or similar.
2. Preparing Your Environment
Install LaTeX: Ensure you have a LaTeX distribution installed (e.g., TeX Live, MiKTeX).
Text Editor: Use a text editor that supports LaTeX syntax highlighting for easier editing.
Required Package: You’ll need the LaTeX package textpos for precise positioning.
3. Including the textpos Package
Add the textpos package to your LaTeX template:
\usepackage[absolute,overlay]{textpos}
Place this line in the preamble of your document, before \begin{document}.
4. Setting Up the Coordinate Grid
Configure the page dimensions to match your pre-printed form:
\setlength{\TPHorizModule}{1mm}
\setlength{\TPVertModule}{1mm}
\textblockorigin{0mm}{0mm} % Adjust if your printer has non-printable margins
This sets up a coordinate grid using millimeters, which is helpful for precise placement.
5. Positioning Text with textblock
Use the textblock environment to place text at specific coordinates:
\begin{textblock}{width}(x_coord,y_coord)
Your content here
\end{textblock}
width: Width of the text block in units (matches \TPHorizModule).
x_coord, y_coord: Coordinates where the text block starts.
6. Customizing Template Fields
Replace standard fields with positioned text blocks. For example:
% Position the invoice number
\begin{textblock}{30}(150, 20)
\textbf{Invoice Number:} \VAR{invoice.invnumber}
\end{textblock}

% Position the invoice date
\begin{textblock}{30}(150, 30)
\textbf{Date:} \VAR{invoice.transdate}
\end{textblock}

% Position the customer name
\begin{textblock}{80}(20, 50)
\VAR{customer.name}
\end{textblock}
Adjust the coordinates (x_coord, y_coord) to match the locations on your pre-printed form.
7. Adjusting Itemized Lists
For line items, use a loop with dynamic positioning:
% Set initial Y-coordinate for items
\newcommand{\itemstarty}{100} % Starting Y position
\newcommand{\itemstep}{10}    % Vertical space between items

% Begin loop over invoice items
\BLOCK{ for item in invoice.items }
\begin{textblock}{180}(20, \the\numexpr \itemstarty - \itemstep * \VAR{ forloop.counter0 } \relax)
\VAR{ item.description } \hfill \VAR{ item.qty } \hfill \VAR{ item.sellprice } \hfill \VAR{ item.linetotal }
\end{textblock}
\BLOCK{ endfor }
\itemstarty: Starting Y-coordinate for the first item.
\itemstep: Vertical spacing between items.
\VAR{ forloop.counter0 }: Zero-based index of the loop iteration.
8. Testing and Refinement
As suggested by Brian Roper in the forum:
Print a Test Invoice: Print the modified invoice on plain paper.
Overlay on Pre-Printed Form: Place the printed invoice over the pre-printed form.
Check Alignment: Hold them up to a light source to verify alignment.
Adjust Coordinates: Fine-tune the (x_coord, y_coord) values based on discrepancies.
Repeat: Iterate until the data aligns perfectly with the form fields.
9. Applying the Customized Template
Save the Template: Save your customized LaTeX file, e.g., custom_invoice.tex.
Update SQL-Ledger Settings:
Log in to SQL-Ledger.
Navigate to “System” > “Defaults” > “Templates”.
Select your new template for invoices.
10. Additional Tips
Backup: Before making changes, backup the original template files.
Documentation: Comment your LaTeX code for future reference.
Margins and Printer Settings: Account for any non-printable areas your printer may have.
Consult LaTeX Resources: If you’re new to LaTeX, refer to online tutorials for additional help.
11. Alternative Solutions
If customizing LaTeX templates is challenging:
Upgrade SQL-Ledger: Consider updating to a newer version with improved template handling.
Use PDF Editing Tools: Generate invoices as PDFs and adjust them using a PDF editor (not ideal for batch processing).
Seek Professional Help: Hire someone with LaTeX expertise to assist in template customization.
Conclusion
By carefully adjusting your invoice template using the textpos package in LaTeX, you can align your invoice data to fit perfectly within the designated areas of your pre-printed forms. This method ensures professional-looking invoices and efficient use of your existing stationery.
He attempted to adjust the nextval of the id sequence after restoring the database but continued to receive the same error.
Community Response
A forum member, “izzyb,” responded with suggestions:
Database Backend Inquiry: Asked whether Dominic was using PostgreSQL 7.x or 8.x and recommended checking the FAQ for PostgreSQL 8.x if applicable.
Adjusting the Sequence Properly:
Suggested verifying the highest id in the invoice table: sql SELECT id FROM invoice ORDER BY id DESC LIMIT 1;
Recommended setting the sequence value using the retrieved id: SELECT setval('invoiceid', xxx); where xxx is the highest id obtained.
Potential Version Upgrade Issues: Noted that upgrading from version 2.0.8 to 2.8.24 is a significant jump and may introduce other issues, possibly causing the sequence to be out of sync.
Caution: Advised Dominic to ensure he has a backup before attempting any changes.
Resolution
Dominic discovered the root cause of the problem:
Duplicate IDs in Invoice Table: His existing installation had duplicate id values in the invoice table, which violated the unique constraint invoice_pkey during the upgrade.
Steps Taken:
Reset the ID Sequence: Adjusted the sequence to align with the correct IDs.
Updated Duplicate Rows: Modified the duplicate row IDs to ensure uniqueness. He noted that these IDs did not seem to be used as foreign keys in other tables.
Outcome: After making these changes, the upgrade proceeded successfully.
Next Challenge: Dominic mentioned that he now faced a login issue, which he intended to address separately.
Summary
When upgrading SQL-Ledger and encountering a “duplicate key violates unique constraint” error:
Check for Duplicate IDs in the affected table (e.g., invoice).
Reset the Sequence to match the highest existing ID:
  SELECT id FROM invoice ORDER BY id DESC LIMIT 1;
  SELECT setval('invoiceid', <highest_id>);
Update Duplicate Rows to ensure all IDs are unique.
Ensure Data Integrity: Verify that changes do not adversely affect foreign key relationships.
Backup: Always create a backup before making significant database changes.
By following these steps, users can resolve upgrade issues related to duplicate keys and successfully transition between SQL-Ledger versions.
In August 2009, a user named Dominic Raywood (username “RubiconCSL“) posted on the SQL-Ledger User Forum seeking assistance on how to raise a VAT-only invoice using SQL-Ledger version 2.0.8.
Issue
Dominic was working with a client who used self-invoicing, meaning the client raised invoices on his behalf. The initial invoice issued did not include VAT because they hadn’t received his VAT registration details. As a result, Dominic needed to raise an invoice solely for the VAT amount corresponding to that initial invoice.
Question
How can I raise my own invoice just for the VAT for that initial invoice in SQL-Ledger?
Solution Provided
A forum member, “dws,” offered the following solution:
Add an Accounts Receivable (AR) Transaction:
Navigate to the AR Transaction module in SQL-Ledger.
Uncheck the Tax Calculation Option:
When entering the transaction, uncheck the tax option so that tax is not automatically calculated on the amount.
Enter the VAT Amount Manually:
Input the VAT amount as the transaction amount.
Ensure Proper Tax Reporting:
Using an AR transaction without a base amount but with a tax component creates a tax-only transaction or invoice.
This method ensures that the VAT amount is included in tax reports. If a General Ledger (GL) transaction were used instead, the tax would not be included in the tax reports.
Dominic’s Feedback
After implementing the suggested steps, Dominic confirmed that the solution worked:
“Brilliant, thanks. Just what I needed—I had overlooked your ‘uncheck the tax’ bit. All working now.”
Summary
To raise a VAT-only invoice in SQL-Ledger:
Create an AR Transaction without a base amount.
Uncheck the Tax Calculation to prevent automatic tax computation.
Manually enter the VAT amount as the transaction amount.
This approach generates a tax-only invoice, ensuring the VAT is correctly recorded and appears in tax reports.
Notes
This method is useful for situations where VAT needs to be invoiced separately due to initial omissions.
Always verify that this process complies with your local tax regulations and accounting standards.
By following these steps, you can effectively issue a VAT-only invoice in SQL-Ledger, ensuring accurate accounting and compliance with tax reporting requirements.
In a forum post from July 2009 on the SQL-Ledger User Forum, a user named Matt (username “red69p51”) reported an issue while creating a new database using SQL-Ledger version 2.8.24 with PostgreSQL 8.3.7 on Fedora 11. He encountered the following error message:
Matt traced the error to specific lines in the Pg-tables.sql file, which attempt to create a sequence named “id”:
--
CREATE SEQUENCE id start 10000;
SELECT nextval ('id');
--
He questioned whether his upgrade missed something or if this was a known issue with that version of PostgreSQL.
Another forum member, “dws,” responded by explaining that the error serves as a security measure to prevent accidental overwriting of existing datasets.
Matt replied, indicating that he was unable to create any new SQL-Ledger databases due to this error, despite not overwriting any existing datasets. He mentioned having other SQL-Ledger databases on the same system with different names.
Upon further investigation, Matt discovered that the PostgreSQL template1 database contained both “basex” and “id” sequences and asked if this was normal.
“dws” clarified that this was not standard behavior. The template1 database in PostgreSQL is used as a template for creating new databases; any objects within it are copied into new databases upon creation. Since “id” already existed in template1, any new database would inherit this sequence, causing the CREATE SEQUENCE id command to fail due to the sequence’s prior existence.
Solution:
The root cause of the issue was that template1 had been inadvertently modified to include objects (like the “id” sequence) that should not be present. The recommended solution was to clean up the template1 database by removing the unintended objects. This would prevent the conflict when creating new databases, allowing SQL-Ledger’s setup scripts to execute without errors.
By ensuring that template1 only contains the default objects provided by PostgreSQL, users can avoid similar conflicts when creating new databases in SQL-Ledger.
In accounting and inventory management, tracking inventory through serial numbers is needed for some businesses. SQL-Ledger offers a feature set that includes the management of serial numbers. In this blog post, we’ll see managing serial numbers easily within SQL-Ledger, highlighting its capabilities and limitations.
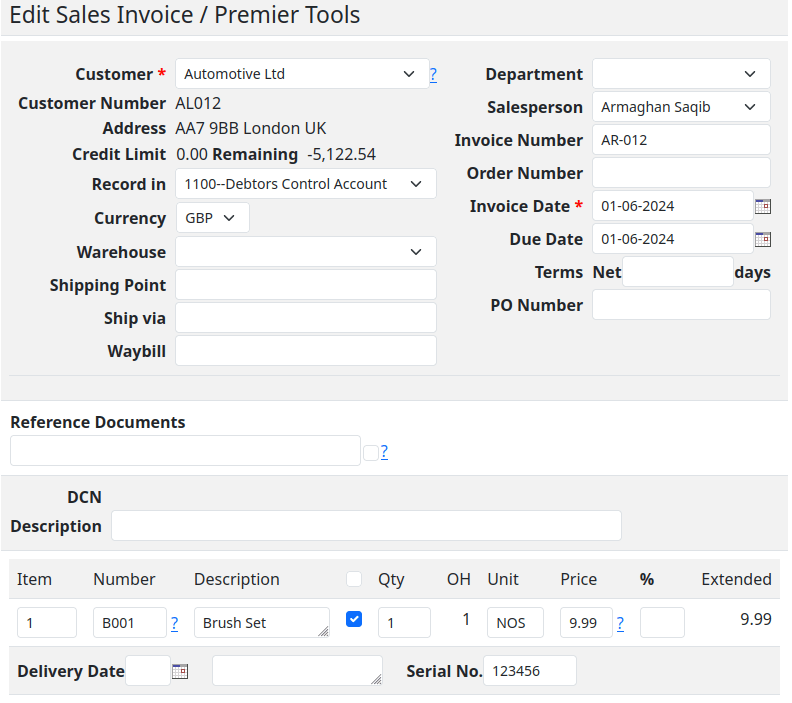
Entering Serial Numbers: Sales and Purchase Invoices
When creating sales and purchase invoices, SQL-Ledger provides an option to specify serial numbers for the items being transacted. When you click on the check box to the left of Qty label, new rows open allowing you to add additional information for each line item including serial numbers for each line item.
When generating a sales invoice, users can input the serial numbers associated with the products they are selling.
Similarly, during the creation of a purchase invoice, the serial numbers of the acquired items can be recorded.
This dual-entry system ensures that both incoming and outgoing goods are meticulously tracked, providing a clear audit trail from procurement to sale.
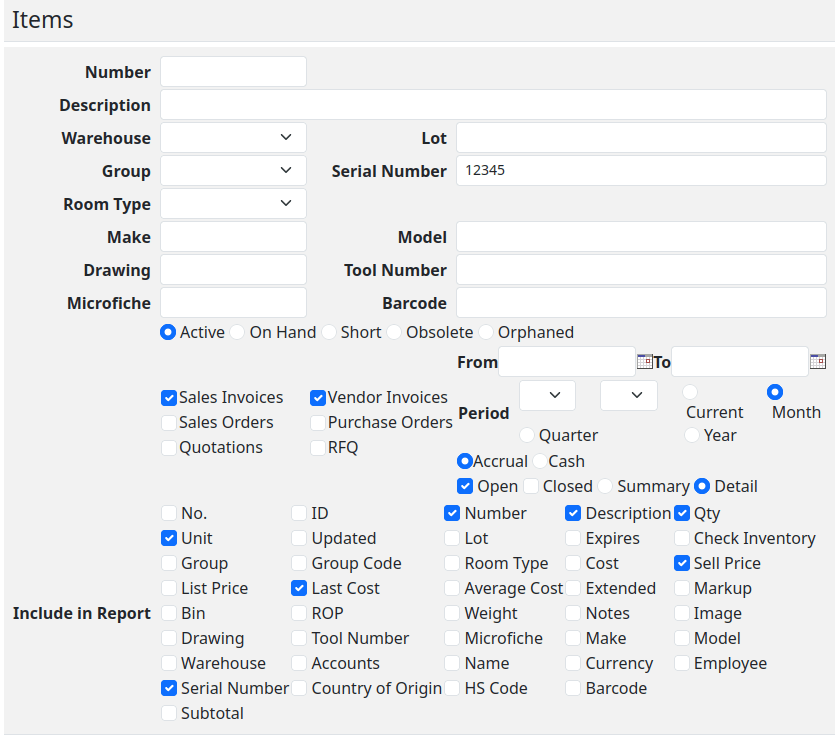
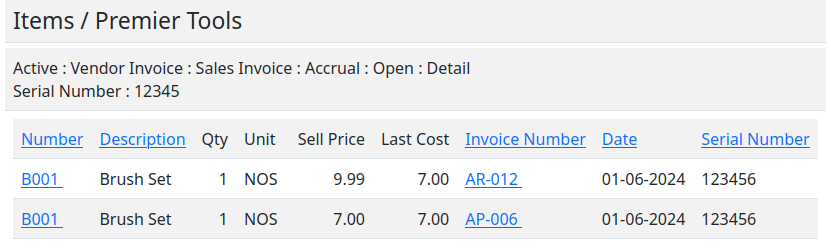
Tracking Serial Numbers: The “All Items” Report
“All Items” report allows users to search for and view the history of any given serial number within the system. Whether you’re verifying the status of a product, conducting an inventory audit, or tracing the lifecycle of an item, the “All Items” report offers a detailed and accessible overview of each serial number’s journey through your business.
A Note on Validation: The Missing Piece
While SQL-Ledger excels in many aspects of serial number management, it’s important to acknowledge a notable limitation: the absence of validation for serial numbers. Currently, if a user enters a serial number in a sales invoice for an item that has not been recorded as purchased, SQL-Ledger will not raise an error. This lack of validation could potentially lead to discrepancies in inventory tracking and reporting if not carefully monitored.
Best Practices for Managing Serial Numbers in SQL-Ledger
To mitigate the limitations and fully leverage the serial number management feature in SQL-Ledger, consider the following best practices:
Double-Check Entries: Manually verify that the serial numbers entered in sales invoices correspond to items that have been previously recorded as purchased in the system.
Regular Audits: Conduct periodic audits using the “All Items” report to ensure the accuracy of your inventory and the proper tracking of serial numbers.
Custom Validation: We also offer custom development options to implement serial number validation within SQL-Ledger, enhancing the integrity of your inventory management process.
Conclusion
SQL-Ledger’s serial number management feature offers a powerful tool for businesses to track and manage their inventory with precision. While the current lack of automatic validation for serial numbers presents a challenge, with careful management and adherence to best practices, users can effectively navigate this limitation. By integrating serial number tracking into your SQL-Ledger workflow, you can achieve greater transparency, accountability, and efficiency in your inventory management practices.
I’m writing today with mixed emotions. Last year, in February, the open-source community lost a visionary leader with the passing of Dieter Simader, the creator of SQL-Ledger ERP. News of his death was received in reply to a support request by a user signed by his wife, Wilma Simader (as disclosed in the forum post linked below). Dieter’s dedication and innovation not only brought us a powerful accounting tool but also fostered a vibrant community of users and developers.
As someone deeply invested in the SQL-Ledger community, I felt compelled to continue Dieter’s legacy. With that in mind, I’m excited to announce that I will be taking over the development and support of the final SQL-Ledger release by Dieter. This means:
Continued Development: I will actively maintain and improve the current version of SQL-Ledger, ensuring its stability and security.
User Support: My forums will continue to be a platform for users to seek help, share knowledge, and connect with each other.
Documentation & Resources: I’m committed to providing comprehensive documentation and resources to empower SQL-Ledger users of all levels.
Usage & Customization Support: Whether you’re just starting with SQL-Ledger or require advanced customization, I’ll be here to offer guidance and support.
While Dieter’s absence leaves a void, I believe his spirit lives on in the strong community he built. Together, we can ensure that SQL-Ledger continues to thrive as a valuable tool for businesses and individuals worldwide.
In the coming weeks, I’ll be sharing more details about my plans for SQL-Ledger’s future. In the meantime, I encourage you to visit my forums and connect with other users.
Let’s honor Dieter’s legacy by keeping SQL-Ledger a vibrant and thriving open-source project.